LIVERPOOL SHIRTDRESS
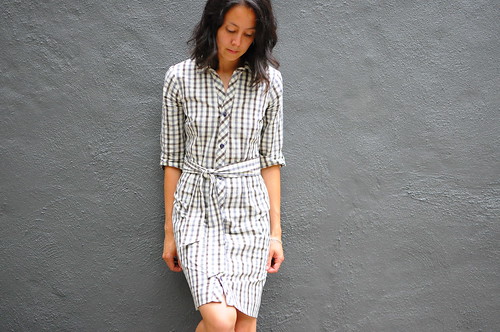
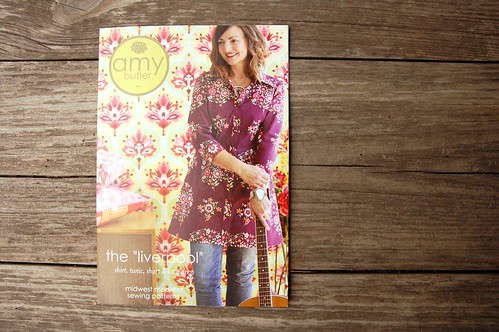
It’s taken me a while to tell you about this project. I made Amy Butler’s Liverpool shirtdress back in June, but needed to make some further adjustments on it and I ended up starting another project instead. You know how it is.
The fabric I chose is from B&J in New York and is a lovely cotton shirting fabric. The buttons I found in my collection from my New York days. They are absolutely perfect with this fabric! Since I worked in the garment district, I would often wander through the fabric and trim shops after work purchasing random bits and bobs. It’s so satisfying when those odd purchases make perfect sense nine year later.
I made a couple adjustments to the pattern right from the start. I adjusted the shape of the collar and made it more square. Amy’s collar was a bit too flared out for me. I also made the dress less a-lined and added side seam pockets. The pattern calls for ties that are sewn into the side seam and can be tied either in the front or the back of the dress. I decided to create the tie as a separate piece. I also made it extra long, so that it wraps around twice and gives me options with the type of knot or bow I might want to do.
Because I make so many Japanese dress book patterns these days, I sometimes forget to read the instructions when I’m doing an English pattern! I didn’t realize until I was almost done the dress that I had cut the back piece of the dress as one panel instead of two pieces. Oops! This meant that I had an extra inch in the body of the dress which actually made a big difference in the fit. I went back, removed the collar, cut the back in half and put in the french seam that was meant to be there. Depending on your print choice for this pattern you may want to omit doing the french seam and opt for cutting out the back as one piece. To do this you simply need to remove half an inch (the seam allowance) from the centre back line of the pattern piece. For plaids or ginghams or stripes, this would allow the print to flow uninterrupted across the back.
I got stuck when I was doing the cuffs. I just couldn’t seem to figure out her instructions no matter how many times I read them. I finally googled this problem and discovered several people posting about having this same issue. If you ever get stuck on a pattern, I recommend doing a search on the internet. You’ll probably discover an answer to your question. Amy has posted an addendum to the Liverpool pattern here that elaborates on how to do the cuff.
Another note on the sleeves. They are long. I did the 3/4 length sleeve and they come very close to my wrists. It would be wise to measure your arms versus the sleeve pieces to figure out the right length for you. I plan on wearing the sleeves rolled up, so I didn’t fix this.
This is also the pattern we did in our Shirtdress Day Camp. We had a really fun week, sewing, chatting and working together. Everyone’s Liverpool turned out fantastic! Here’s our class photo. We have one more day camp coming up this summer and I’m looking forward to being a student this time and spending the entire week sewing and quilting.


16 comments
Your dress looks fantastic!
Darn, I wish I was back in Toronto for the summer so that I could’ve taken that class! I have yet to find a sewing space as lovely as the workroom in London. 🙁
you choosed the perfect fabric for that! beautiful dress!
Cute dress!
Lovely job. I tried my hand at this pattern too, and while I generally like the result (and the fact that as a beginner, I was able to put the whole thing together), the A-line is much too pronounced for my shape (i.e., it makes my hips look even wider). Any tips for a novice about the best way for straightening out the A-line without wrecking the pattern? I even wondered if I should omit the front darts… Thanks. I so love reading and being inspired by this blog.
Love this dress!
I only have one shirt dress and I was planning to make more. Yours looks gorgeous. It looks terrific on you. Thanks for sharing your tips. It is really appreciated.
That’s a great version of the shirtdress! I have the pattern and am daunted by it, but at least now I’ll know how to add side seam pockets 🙂
Thanks for sharing your tips – I have a medallion print that I purchased for this, and it would be nice to cut the back as one piece.
Thanks for providing such great tips and beautiful inspiration!
beautiful dress and lovely fabric 🙂
you look so great!
I love the dress, you are so talented!
Ooh I love that dress. I saw that pattern today actually.. I might have to pop back in to the store tomorrow and see if its still there.. Im inspired now!
So pretty! I think I’ll have to take another peek at this pattern …
One of my favouries. You look beautiful in it.
this is beautiful, great job!
I’m loving this on so many levels. The fabric selection, the cut, the color. It’s the kind of dress that makes me long to be tall and thin with beautiful wavy hair. ::sigh::
I just made this…it was my first dress and turned out cute. I do wish I had NOT sewn the belt in and had found your blog first–bc I would have made the belt separate as you did. I realize I can easily take it apart, but since it’s my first dress–and I’m self taught, this was quite coup for me and I just need to go lay down.